

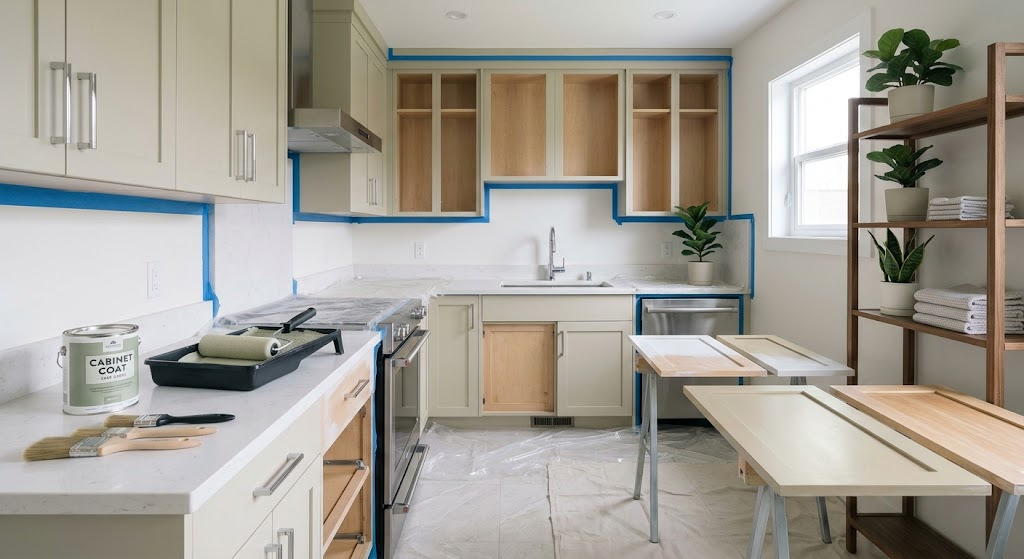
Introduction
Fresh paint can change a kitchen faster than almost any other project. It can also go wrong fast. Doors chip around the handles, the finish stays tacky for weeks, and brush marks show up the moment afternoon sun hits them. In most cases the paint is not the problem. Skipped prep is.
This guide explains how to paint kitchen cabinets so the finish stays smooth and hard for years. It also covers what most tutorials skip: what your cabinets are made of, when you really need to sand, which paint to buy, how long the job honestly takes, and how to fix mistakes.
The Short Answer
Here is how to paint kitchen cabinets in brief. Remove the doors and hardware, clean off grease, dull the glossy finish, fill holes, apply a bonding primer, then brush and roll two thin coats of cabinet enamel with a light sand in between. Plan on five to seven working days, then give the paint two to four weeks to fully harden.
Key points:
- Prep decides how long the paint lasts.
- Your cabinet material decides which prep and primer to use.
- Thin coats beat thick coats every time.
- Dry to the touch does not mean cured.
- In a home built before 1978, test for lead before you sand.
Is Painting Your Kitchen Cabinets Worth It?
Painting is the cheapest way to change how a kitchen looks. Current 2026 cost guides put professional cabinet painting at roughly $2,500 to $6,500 for an average kitchen, with quotes running higher or lower by region and cabinet count. Doing it yourself usually costs a few hundred dollars in materials. What you spend instead is time and patience.
If you are weighing how to paint kitchen cabinets yourself against hiring a pro, think about your schedule first. Most beginners need two weekends or a week of evenings. That is normal, not a sign you are doing it wrong.
Painting works well when the boxes are solid, the doors are in good shape, and you like your layout. It is a poor fit when cabinets are water damaged, sagging, or covered in peeling vinyl. In those cases a bigger update may pay off more, and our guide to the benefits of kitchen remodeling can help you decide where your money goes furthest.
Know Your Cabinet Type Before You Buy Anything
This is where most guides go quiet. Before you decide how to paint kitchen cabinets, find out what they are made of. A method that works on solid oak can fail on thermofoil. Take one door off and look at the back and the edges, then use this table.
| Cabinet Type | How to spot it | Biggest Risk | Prep that works | Primer |
|---|---|---|---|---|
| Solid wood, stained or clear coated | Visible grain, glossy finish | Slick finish makes paint peel | Clean, deglosser, scuff sand with 120 to 150 grit | Bonding or stain-blocking primer |
| Oak or other open-grain wood | Deep grain lines you can feel | Grain texture shows through the paint | Same as above, plus grain filler | Bonding primer, sanded lightly |
| Previously painted wood | Painted surface, maybe brush marks | Flaking old paint, possible lead in older homes | Clean, repair chips, scuff sand | Bonding primer |
| MDF doors | Smooth, no grain, heavier than wood | Bare edges soak up moisture and swell | Seal edges, scuff lightly | Shellac-based or bonding primer |
| Wood veneer | Thin wood layer, repeating grain | Sanding through the thin top layer | Deglosser, very light hand sanding | Bonding primer |
| Laminate | Plastic look, hard slick surface | Peeling at edges and corners | Clean, deglosser, light scuff, test a small area | Bonding primer made for slick surfaces |
| Thermofoil (vinyl wrap) | Seamless smooth sheet, may bubble near heat | Paint may fail, wrap may already be lifting | Only if the wrap is tight and sound | Bonding primer |
Safety First: Lead, Dust, and Fumes
Safety matters as much as technique when you learn how to paint kitchen cabinets. Do not skip this part.
- Lead paint: Lead-based paint was banned for homes in 1978. If your house is older, assume old layers may contain lead and test before sanding. EPA-recognized swab kits, such as 3M LeadCheck and D-Lead, are sold at home centers and usually cost $10 to $30. Painting over intact paint is generally fine. The danger is the dust from sanding. If a test is positive, do not dry sand. Leave the paint intact, use wet methods, or hire an EPA-certified lead-safe pro.
- Dust: Wear a fitted N95 mask and safety glasses when sanding. Vacuum instead of sweeping.
- Fumes: Open windows and run a fan. Oil-based and solvent products need a respirator with organic vapor cartridges.
- Skin: Deglossers and degreasers can irritate skin, so wear nitrile gloves.
- Kids and pets: Keep them out of the work area until dust is cleaned up and fumes are gone.
Tools and Materials
Gather everything before you start. Anyone learning how to paint kitchen cabinets for the first time will save hours by not making store runs mid-project.
- Screwdriver or drill, plus zip bags and painter's tape for labeling
- Degreaser or a TSP substitute, and a liquid deglosser
- Sandpaper in 120 to 150, 220, and 320 grit, or sanding sponges
- Wood filler or spackle, a putty knife, and paintable caulk
- Bonding primer
- Cabinet enamel paint
- A good 2 to 2.5 inch angled brush and a 4 inch foam or microfiber roller
- Microfiber cloths and a vacuum with a brush attachment
- Drop cloths or rosin paper, and painter's pyramids or push pins to prop doors
- Mask, gloves, and safety glasses
How much paint? A medium kitchen with about 20 doors and drawer fronts usually takes around one gallon of primer and one to two gallons of paint. Going from dark to light, or covering a lot of raised panels, can take more. When in doubt, ask the paint counter to help you size it.
Choose the Right Paint, Primer, and Sheen
Paint choice is where many projects are won or lost. Here is how the main options compare in real use.
- Waterborne alkyd (urethane-modified) enamel: Levels out well, cures hard, and resists yellowing. It costs more but is a popular pick for cabinets.
- Acrylic latex enamel: Easy cleanup and quick drying, which suits beginners. It can show roller texture and takes time to harden.
- Oil-based enamel: Very smooth and tough, but it has strong fumes, long dry times, and can yellow on white over the years.
- Chalk paint: Easy prep, but it usually needs a protective topcoat and wears faster in a busy kitchen.
- Paint and primer in one: Helps coverage, but it is not a replacement for a bonding primer on glossy surfaces.
Sheen: Satin and semi-gloss are the usual choices. Higher sheen shows every flaw, so satin is more forgiving on older doors. Semi-gloss wipes clean more easily. Buy a sample and paint a spare door or a piece of scrap first.
Color: Look at samples in morning and evening light, next to your countertop and backsplash. Door style also changes how a color reads, so it helps to compare shaker, flat panel, and raised panel looks. Our guide to kitchen cabinet styles walks through 15 popular designs.
Plan Your Time Like a Pro
The biggest mistake people make when learning how to paint kitchen cabinets is underestimating drying time. Painting itself is quick. Waiting is what takes days. Here is a realistic schedule.
- Day 1 (3 to 4 hours): Empty the cabinets, remove doors and hardware, label everything, set up your workspace, and clean all surfaces.
- Day 2 (4 to 5 hours): Sand or use a deglosser, fill holes, caulk gaps, then vacuum and wipe.
- Day 3 (3 to 4 hours): Prime the backs and boxes, then the fronts once dry. Sand lightly with 220 grit.
- Day 4 (3 to 4 hours): First coat on backs and cabinet boxes.
- Day 5 (3 to 4 hours): Second coat on backs and boxes. Flip doors and do the first coat on fronts.
- Day 6 (3 to 4 hours): Second coat on fronts.
- Day 7 or later: Rehang doors after at least 24 hours of drying, then add hardware.
Time-saving techniques that actually work:
- Work in an assembly line. Do one step for every door before moving to the next step, instead of finishing one door at a time.
- Use dry time wisely. Order hinges, fill holes, label bags, and clean tools while paint dries.
- Prop doors up. Push pins in the back or painter's pyramids let you paint the front while the back stays clean.
- Wrap your brush and roller. Sealing them in plastic wrap between coats saves cleanup for water-based paint.
- Set a phone timer. Note the recoat time from the can so you neither rush nor wait too long.
- Work in zones. Paint one side of the kitchen at a time so you can still make coffee and use the sink.
- Photograph first. A quick photo of hinge positions and door order saves guesswork later.
Real-life example 1: the weekend rush. Picture a kitchen with 22 doors and 8 drawers. The owner plans one weekend: clean Friday, prime Saturday, paint Sunday, rehang Monday. By Tuesday the doors stick to the frames and paint tears off in places when they open. The paint was fine. The doors went back before it hardened. The fix is to take them off again, wait a week, lightly sand the sticky spots, touch up, and add clear bumpers.
Real-life example 2: the two-weekend plan. Same kitchen, different plan. Weekend one covers prep and priming. During weekday evenings the owner orders new hinges, fills holes, and labels bags. Weekend two is painting, and the doors go back the following weekend. It takes longer on the calendar, but nothing gets redone.
How to Paint Kitchen Cabinets Step by Step
The steps are the same for any kitchen. How long each one takes depends on your cabinets.
Step 1: Remove Doors, Drawers, and Hardware
Label each door and its matching frame spot with numbered tape. Put hinges and screws for each door in a small bag. Take off drawer fronts, pulls, and old felt bumpers. Empty cabinets as much as you can.
Step 2: Set Up a Clean Work Area
Find a flat, dust-free space like a garage or spare room. Lay doors flat on drop cloths. Cover counters, floors, and appliances with paper or plastic. Tape off walls, the range hood, and the insides of drawers.
Step 3: Clean and Degrease
Kitchen cabinets collect cooking grease that you cannot always see. Paint will not stick to it. Scrub every surface with a degreaser, pay extra attention near the stove and around handles, then wipe with clean water and let everything dry.
Step 4: Sand or Use a Deglosser
Here is the question people argue about: do you need to sand? In most cases, a light scuff is the safest route. Use 120 to 150 grit to dull the shine, not to strip the finish. A liquid deglosser can replace sanding on sound, factory-finished wood when paired with a good bonding primer, but sanding gives paint the best grip. For veneer, laminate, and thermofoil, skip heavy sanding and use deglosser plus bonding primer. Wipe off dust with a damp microfiber cloth.
Step 5: Fill, Caulk, and Repair
Fill old hardware holes and dents with wood filler, then sand smooth. For open-grain oak, a grain filler will keep the texture from showing through. Run a thin bead of paintable caulk where face frames meet the wall or trim. Wipe up extra caulk right away.
Step 6: Prime
Primer is the glue between old surface and new paint. Apply one thin, even coat of bonding primer to every surface you plan to paint. A dark color or a big color change may need a second coat. Let it dry fully, following the can.
Step 7: Sand Lightly After Primer
Gently sand the primed surfaces with 220 grit. You are only knocking down bumps and drips, not removing primer. Vacuum and wipe with a damp cloth.
Step 8: Paint in Thin Coats
The core of how to paint kitchen cabinets is thin, even coats. Brush the grooves and edges first, then roll the flat areas right away to blend the wet edges. Finish each stroke in one direction, and do not go back over paint that has started to set. Thick coats look better at first but sag and stay soft.
- Paint the backs of doors first, let them dry, then flip and paint the fronts.
- Follow the recoat time on the can.
- If you feel grit, sand lightly with 320 grit between coats and wipe clean.
- Two coats is usual. Dark colors may need a third.
- Most cabinet paints can be applied between roughly 50 and 90 degrees F, but check your label. High humidity slows drying.
Brush and roller or sprayer? A sprayer gives the smoothest finish, but it needs a lot of masking and some practice. A good foam or microfiber roller with a quality brush gives beginners a result that looks professional from a normal distance.
Step 9: Let It Dry, Then Reinstall
Wait at least 24 hours before rehanging doors. Longer is better. Pull painter's tape when the paint is dry to the touch but not fully hard, at a low angle. Add small clear bumpers to door corners so painted surfaces do not stick. Treat cabinets gently for the first week and avoid wet wiping while the paint cures.
Fix Common Problems
Even careful work can go wrong. Here is how to handle the usual issues.
- Brush or roller marks: Let the paint dry, sand lightly with 320 grit, wipe, and apply a thin new coat.
- Gritty or rough finish: Usually dust or dried paint. Sand smooth and recoat.
- Sticky doors: The paint is not cured. Wait longer, add bumpers, and check for blocking at frame edges.
- Chipping near handles: Often poor sanding or cleaning in that spot. Wait until cured, then touch up.
- Peeling at edges: Poor adhesion. Sand back to firm paint, prime, and repaint.
- Wood grain showing through: Use grain filler next time. For now, a skim of filler, sanding, and another primed coat can help.
- Tiny craters (fisheyes): Grease or silicone residue. Clean, sand, and spot prime.
Hardware and Reassembly
New hinges look and work better than old painted ones, and a set often costs less than people expect. If you switch hardware, plug old holes before priming and use a template for new ones. Check alignment before you tighten everything, and do not overtighten screws into freshly painted surfaces.
Care for Painted Cabinets
Save a small jar of leftover paint, labeled with the color and date, for touch-ups. Add a quick cabinet check to your monthly home maintenance checklist so small chips get fixed before they spread.
Frequently Asked Questions
Do I need to sand kitchen cabinets before painting?
Usually a light scuff sand is best. A deglosser plus bonding primer can work on sound, factory-finished wood, but sanding gives the strongest grip. Test for lead first in homes built before 1978.
How long does it take to paint kitchen cabinets?
Plan on five to seven working days for a DIY job, spread over one to two weeks. The paint can take two to four weeks to fully cure.
Is it hard to learn how to paint kitchen cabinets yourself?
It is more about patience than skill. If you can clean, tape, and paint in thin coats, you can do it. The hard parts are prep and waiting.
What is the best paint for kitchen cabinets?
A waterborne alkyd or a quality acrylic enamel in satin or semi-gloss works well for most kitchens. Always pair it with a bonding primer.
How many coats do I need?
One coat of primer and two coats of paint is typical. Dark colors may need extra primer or a third coat.
Can I paint laminate or thermofoil cabinets?
Yes, if the surface is in good shape, but peeling is a higher risk. Use deglosser and bonding primer, and test on a hidden door first.
Do I have to paint the insides?
No. Most people paint the outside, the door backs, and the visible frame edges only.
How long will painted cabinets last?
With good prep and quality paint, many painted finishes hold up for years. Heavy-use spots like handle areas may need occasional touch-ups.
Conclusion
Painting cabinets is less about talent and more about habits. Know your cabinet material, clean well, prime properly, use thin coats, and be patient with drying time. That is the whole secret of how to paint kitchen cabinets with a smooth finish that lasts.
Start small if you feel nervous. Paint one door as a test, check it after a week, then commit to the rest. If this project went well, browse more weekend upgrades in our DIY and projects section. And whenever you revisit how to paint kitchen cabinets, remember the order: prep, prime, paint, wait.